Monday, May 2, 2022

Now Available!

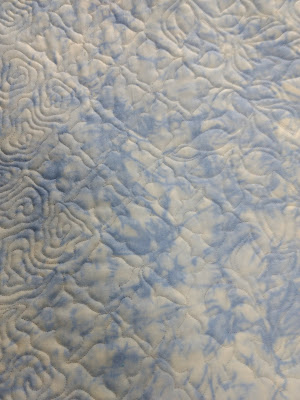
Exciting news! I'm now designing my own digital pantographs. They are available in my Etsy Shop.

As of now I have 40 designs published with 7 more going up later today. Here are just a few: 


Doing Doughnuts


 Wishing


Please come check out my shop and send your favorite longarmer my way!

Wednesday, May 26, 2021

Quick Update/Available Designs

After nine years of running my business I finally have a place online to see my available designs! I'm hoping to get a real website up and running soon but this will be a good thing in the meantime. Check out my Pinterest Board!

Wednesday, September 13, 2017

Making Connections: A Free-Motion Quilting Workbook Blog Hop and GIVEAWAY!

Welcome to my stop on the Making Connections blog hop! Dorie Hruska's new book is filled to the brim with variations on the classic Continuous Curve design. If you've wanted to learn to incorporate continuous curves into your quilting, this is the book for you. If you already use continuous curves and want to mix things up a bit, this book is also for you! Dorie does an excellent job of teaching readers how to navigate around a quilt and incorporate any desired variety of designs. I especially liked how she brings the designs out of the middle of the quilt and into the borders. Continuous curves are usually done in grid-based areas, and Dorie shows you how to mark grids anywhere you want to take them.
One design in the book that I especially liked was Connecting Brackets. The example above is from the book. As this is a workbook, there are practice pages to doodle and draw and work on muscle memory. This particular design is made of two basic S-curves, going in opposite directions. 

I was recently working on a custom quilt for a client. It was set out like rows of bricks in a kind of herringbone pattern, and she had specific ideas in mind for how she wanted each row quilted, except for two. One of the rows seemed like the perfect candidate for Connecting Brackets. The understated design added some nice texture without distracting from the fabric. 
 I used a variegated thread that blended nicely without disappearing or drawing too much attention to itself.
 I was a little surprised at how difficult it was for my brain to do this design, but I love the final effect in this particular quilt. I can see so many applications for designs from this book in nearly any quilt. They are so versatile!
 Fortunately the photography in the book is much better than mine and the designs really come to life.
And here's a shot of this area on the back.

Would you like your own copy of Making Connections? Leave a comment below by Saturday, September 16th telling me what part of your quilting you would like to improve. Mr. Random will pick a winner that night. If the winner lives in the US you will receive a physical copy of the book; international winners will receive an e-book version.

If you haven't already, be sure to check out the other stops on the blog hop!
Friday Sept 1st:C&T - www.ctpub.com/blog/

Monday Sept 4th:
Holly Anne Knight - www.stringandstory.com/  IG: stringandstory
Susan Arnold - www.quiltfabrication.com  -  IG: quiltfabrication

Tuesday Sept 5th:
Becca Fenstermaker - www.prettypiney.com  IG: prettypiney
Teri Lucas - www.generationqmagazine.com IG: genqmag 

Wednesday Sept 6th:
Sherry Shish - poweredbyquilting.com  IG: poweredbyquilting
Pam Morgan - www.mysweetlittlestitches.com  IG: sweetlittlestitches

Thursday Sept 7th:
Laura Piland www.sliceofpiquilts.com  IG: sliceofpiquilts
Katy S - www.katyquilts.net   IG: katyquilts

Friday Sept 8th:
Suzy Webster - websterquilt.blogspot.com  IG: websterquilt
Bernie Kringel - needleandfoot.com/  IG: needleandfoot

Monday Sept 11th:
Jamie Mueller - www.sunflower-quilts.com  IG: sunflower_quilt
Nancy Scott - masterpiecequilting.blogspot.com   IG: masterpiecequilting

Tuesday Sept 12th:
Sherri Noel - www.rebeccamaedesigns.com  IG: rebeccamaedesigns
Anorina Morris - www.sameliasmum.com  IG: sameliasmum

Wednesday Sept 13th:
Yvonne Fuchs - www.quiltingjetgirl.com  IG: quiltingjetgirl
Barbie Mills - thequiltingmill.blogspot.com  IG: thequiltingmill

Thursday Sept 14th:
Afton Warrick - www.quiltingmod.com  IG: quiltingmod
Kathy Bruckman - kathyskwiltsandmore.blogspot.com  IG: kathyskwiltsandmore

Friday Sept 15th:
Susan Arnold - www.quiltfabrication.com    IG: quiltfabrication
Dorie Hruska - www.forever-quilting.com/blog  IG: foreverquilting

Wednesday, August 24, 2016

Triaxial Weave Purse

It has been WAY TOO LONG since I have blogged. I have a couple of things I need to catch up on, but you can see a somewhat more constant update of what I've been doing on Instagram.

A while ago I discovered @t_jaye on Instagram and her handy little Wefty Needle. I've done a little fabric weaving before (tutorial here!) and knew I had to try this method. I was especially smitten with the triaxial weaves, meaning that rather than just horizontal and vertical axes, there are three. (Sorry for the terrible photo quality, I took the first one at night to post on Facebook. Ha.)


I used part of a Jaybird Quilts palette jelly roll. This was just after I had baby #4 and wanted something that would be quick, so I used the full strips. Next time I will cut them in half lengthwise and do something tinier! I put some fusible interfacing on my board first and fused the fabric to it before taking the pins out. It worked fairly well to stabilize it until quilting, only a few edge pieces fell out and they were easy to put back in.

I cut it into two pieces and added some solid navy strips to the top and bottom. I used a lovely home dec weight solid sateen by Freespirit.

Quilting was an issue. I quilted the borders first, but knew I wouldn't be able to quilt over the weaving without my foot catching and causing all kinds of mayhem. Water soluble stabilizer worked wonders! I laid it over the top, quilted, and carefully rinsed (and rinsed and rinsed) it out. I did some fun graffiti quilting with monofilament thread to add texture without distracting from the 3-D effect of the weaving.

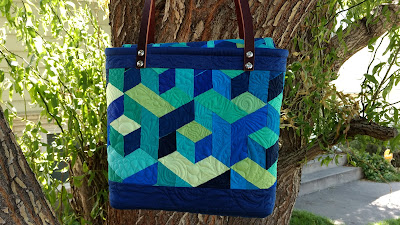
I didn't get any more progress shots, so here's the finished purse! 


I did an open triaxial weave for the flap and topstitched the strips in place.


It's hard to tell, but it has all of my favorite pockets! Cell phone, pens, and two zipper pockets, one waterproof. Because hand sanitizer explodes.


I love how it turned out!

Friday, June 5, 2015

Blocks from the Past Quilt Along: Pages 50, 51, and 82

First of all, I'm SO SORRY that this is later than planned. I totally spaced it. So better late than never, right?

Page 50, Robbing Peter to Pay Paul
This is one of my very favorite blocks in the book.
 It's all made of squares, rectangles, half square triangles, and flying geese, so it was very straightforward and easy to assemble. I made mine 12.5", but even at 6.5" it would be very manageable. I had a lot of fun playing with the color placement. I used the no-waste method to make my flying geese and it worked really well.

Page 51, Gentleman's Fancy
I didn't need this block in my quilt so I made this one for Marion. I let her square it up so it would be the same size as her 6.5" blocks, so it's not squared in this photo.
This one was just fine to assemble. I followed the measurements and instructions in the book more closely on this block than I did for any of my other blocks. I made sure to use a SCANT 1/4" seam which I highly recommend. To make my "E" triangles, shown in darker green here, I cut the squares 1/8" larger than recommended so I could square the center portion. The flying geese were made with the stitch and flip method which I really liked for this size. Overall I liked this block.

Page 82, Tulip
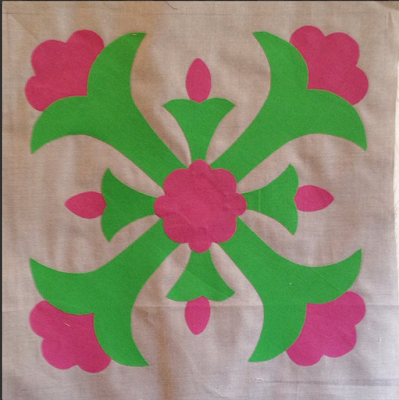
I made this block for Marion too. I'm not sure why it's called "Tulip," as it definitely does not look like a tulip. But it is still pretty and I like how it turned out.
Sometimes I really like applique, and sometimes I really don't. The day I made this block was not a day that I liked applique! I opted to fuse it, and then Marion said she would be okay with quilting it down, so I didn't sew around it at the time. Marion finished her quilt recently and the pieces stayed attached just fine until quilting time. The pieces weren't too ridiculously tiny so I think it would have been fine to needle-turn this one, if you like that kind of thing!

I will be quilting my quilt next month and then I'm excited to share it with you! I love how it looks so far.

Thursday, May 14, 2015

Kimberly's "Eclipse" Quilt

It seems that each new quilt that comes through my studio becomes my favorite. I haven't been blogging much lately, especially about quilting that I have been doing for clients, but this one is definitely worth sharing. It's a stunner, and my new favorite.

Please excuse all of the phone photos.
This quilt is called "Eclipse." It was designed and pieced by Kimberly Bourne of Main Street Market Designs. The pattern is currently available as a preorder for $3 off what the regular price will be. It's paper pieced, and Kimberly's patterns are very detailed. 
 I immediately knew when I saw this quilt for the first time that it would be a perfect candidate for straight line geometric quilting within the triangles.
I took this photo at night. Mmm, texture. Most of the techniques I used on this quilt were inspired by Angela Walters' Dot-to-dot Quilting.

 I just love the rainbow of colors from the Alison Glass fabrics (Sunprints and Ex Libris).

 It was just so FUN to quilt this.
 As much as I love the front, the back is pretty great too.
 In the center I decided to quilt some curves, echoing the appearance of curves on the rest of the quilt.
 Seriously, I love the texture on the back.
You can preorder this amazing quilt pattern now here! Thank you Kimberly for letting me quilt it for you! This gorgeous quilt is hanging this weekend in the Andover Fabrics booth at International Quilt Market.

Monday, May 4, 2015

Blocks from the Past QAL: Pages 42, 43, and 78

This weeks blocks were kind of tricky, not unlike many in this book. But they were definitely doable.

Page 42: Flying Geese
I didn't need this block for my quilt so I made this one for Marion and it's the 6.5" that the book suggests. I chose to use the no-waste method to make my flying geese. Normally I really like this method, but I think these little guys were just too small to keep accurate this way. Luckily my block ended up slightly larger than 6.5" rather than smaller, but if I was to do this again I would definitely paper-piece the flying geese.
One thing I really liked about this block was being able to play with the color placement to make a star in the middle.

Page 43: Corn and Beans
This block tried to kick my butt. I won't mince words--it wasn't easy. Fitting all the shapes together was a bit of a challenging puzzle. A kind of fun puzzle. That said, I love how it turned out so it was worth it. I made mine 24" so it's a HUGE block. I wasn't really paying attention to the instructions in the book as I was assembling it so I ended up altering the background a little bit to make it work. If you notice on the corners of mine the background is made out of one square and two triangles... it's supposed to be one large triangle on each corner. I had already made half square triangles so I decided to just go with it rather than pick it out. Honestly I don't particularly like sewing on that type of corner triangle so it actually made the block a little bit easier. It also makes my low-volume background more diverse so I'm okay with that. 

Page 78: Princess Feather
I made this one for Marion too. I cut the background slightly larger than 7" so it could be trimmed down to an accurate 6.5" after finishing the applique. These pieces were TINY. Thinking of doing turned-edge hand applique with these itty bitty pieces nearly gave me heart palpitations, so I decided to use fusible web and then sew it down with a tiny stitch with monofilament thread. Overall it worked out very well and I would definitely do it this way again.

I finished sewing my top together and I love how it turned out! It will be a while until I have time to quilt it so I'll wait to share it here until then, but you can scroll back a ways in my Instagram feed if you would like to see it.
Related Posts Plugin for WordPress, Blogger...